


How to Perform Quick Clothing Color Changes in Photoshop
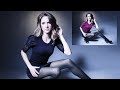
Ever shot an image of a model and kicked yourself about the color of what you had them wearing? Perhaps the clothing choice doesn’t suit the final image once you’ve put it through some processing software. By using masking and selective color tools, you can make fashion decisions in hindsight.
The first thing to do is to mask the clothing item you want to change. Masks can be fiddly, but this great tutorial by The Slanted Lens simplifies the process with some great tips along the way.
Head to the quick selection tool, and click around the edges of the clothing item. Remove any areas accidentally selected, like the background, and click the ‘Add Mask’ button in the layers panel.
Next, double-click the mask and hit ‘Mask Edge…’. This is where you can refine the edge of the mask, with the ‘Decontaminate Colors’ checkbox doing well in areas where hair may fall over the target clothing.
Using the ‘Selective Color’ menu option, you can adjust all sorts of color tones within the selected mask. Not able to achieve exactly what you want? Overlay a solid color layer and adjust the opacity, with an overlay light, letting you see through the color layer.
It’s recommended you play around with all of the layer blending modes, like soft light and hard light. Each situation will require a different approach, but the tools used are the same.
Get even more creative for even funkier changes, like swapping out a blue t-shirt for a fluorescent pink one!
Contributer : PetaPixel http://ift.tt/2tuQ3h1
 Reviewed by mimisabreena
on
Friday, June 16, 2017
Rating:
Reviewed by mimisabreena
on
Friday, June 16, 2017
Rating:


No comments:
Post a Comment