


Sendible Review And Tutorial: Social Media Management Made Easy
Are you tired of jumping from one social channel to another, trying to keep pace with the endless interactions and struggling to find relevant content to share with your audience?
If so, you need a social media management tool.
Or perhaps you’re already using one social media tool for scheduling posts and another for reporting?
In which case, it’s time to consolidate.
In this article, you’ll learn how Sendible can help you to manage, monitor, and measure you and your clients’ social media activities.
What is Sendible?
Sendible is a social media management tool that helps agencies, companies, and individuals boost their productivity on social media. Using the all-in-one dashboard, you can schedule messages, engage with your audience, and measure your performance across all social media channels.
In this review and tutorial we’ll focus on these four key areas:
- How to engage with your followers using the unified social inbox.
- How to schedule recurring social messages to keep your evergreen content alive.
- How to find the best-related content to share with your audience.
- How to monitor your growth to discover what works, and what doesn’t.
But it’s important to note that Sendible is a comprehensive tool so it’s capable of a lot more.
Let’s get started.
Part 1 – Social Inbox
Sendible analyzes each of your social media channels for new posts, comments, and other activities. To help manage your time, you can view and respond to all your messages in one unified social inbox, just like you would for email.
How to set up your Priority Inbox
The Priority Inbox combines all your social streams into one unified stream.
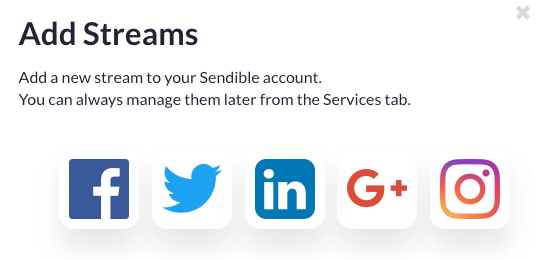
First, you need to add individual streams; for instance, a Twitter stream or a Facebook stream. You do this by clicking the New Stream button at the top of the dashboard:

And then selecting which social network streams you want:
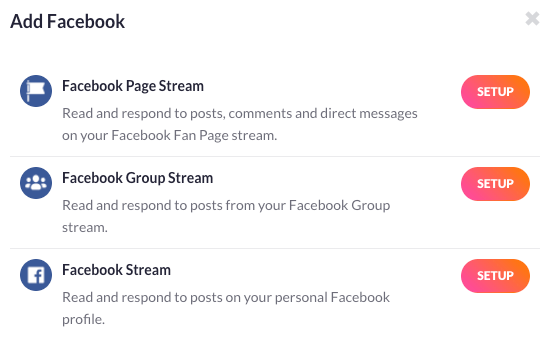
For example, if you choose Facebook, you have three streams to select from – Page, Group, or Profile:
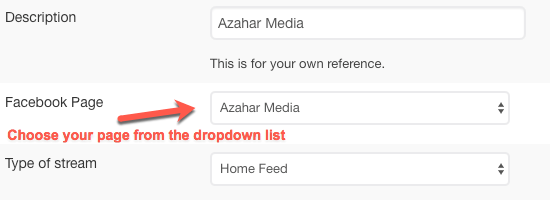
You can add multiple Pages and Groups that you manage:
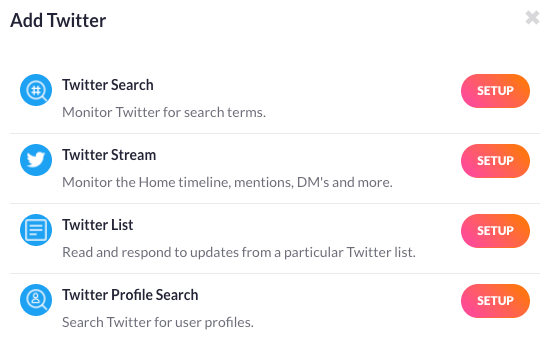
If you choose Twitter, you can select from Twitter Search, Twitter Stream, Twitter List, and Twitter Profile Search:
Note: each stream that you add uses one of your available services that’s included with your chosen Sendible plan. See the Pricing section for more info.
After you’ve added your Streams, your dashboard looks a little like this:
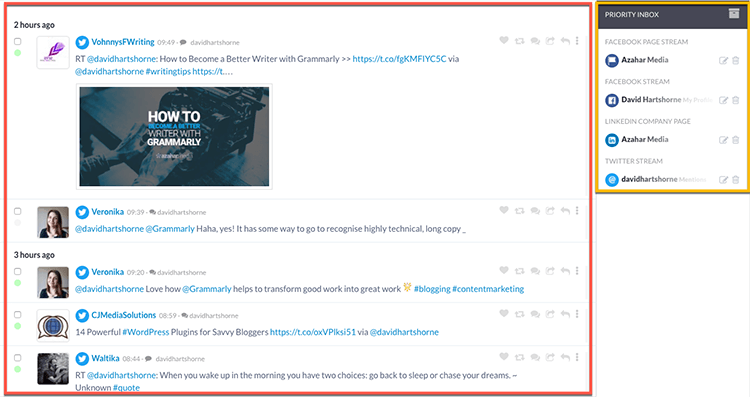
On the left-hand side, (inside the red frame), is the unified stream of the Priority Inbox. On the right-hand side, (inside the yellow frame), are the individual streams of the Priority Inbox.
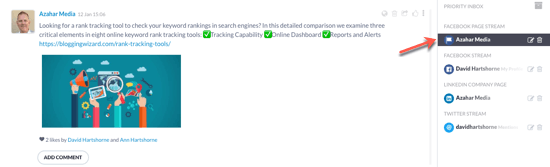
The Priority Inbox displays the unified stream by default. But if you click on an individual stream from the right, then only that stream displays. For example, click on the Facebook Page stream:
Managing your Priority Inbox
Once you’ve set up your Priority Inbox, you can start handling the messages.
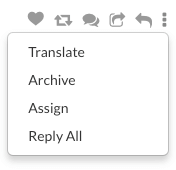
For each message in the Priority Inbox, depending on the social channel it’s come from, you have the option to:
- Like
- Retweet
- Show the conversation
- Reply to the message
- Repost to other social channels

The three ‘hamburger’ dots at the end (yellow frame) offer a few more options; translate, archive, assign and reply all.
The Archive option lets you remove a message from the Inbox once you’ve actioned it. This way you know you only have to action what’s remaining.
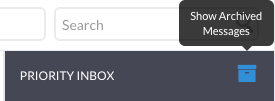
You can select all, multiple, or individual messages to be archived:
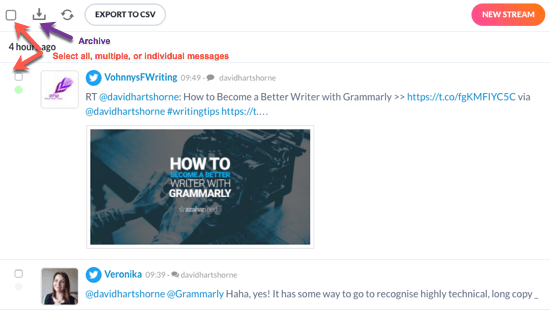
You can view your archived messages by clicking the box symbol, so it turns blue:
The Assign option lets you allocate messages to different team members. For instance, you may want to distribute the workload, or you might want to get a specialist answer to a query.
Summary
Sendible’s Priority Inbox lets you read and respond to new posts, comments, and other activity from all your social channels in one place. Once actioned, you can clear your inbox by archiving the messages. It’s an excellent way to engage with your audience and manage your workload.
Part 2 – Publishing messages
Sendible offers a number of ways to publish messages on social media. From a once only post to evergreen recurring content, there’s a method to suit you.
How to compose and schedule a message
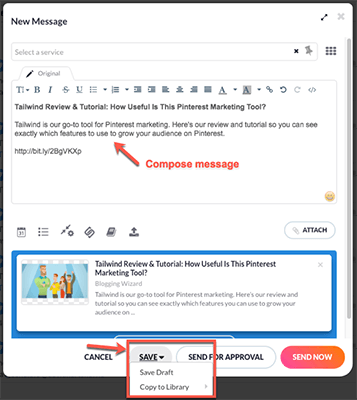
The Compose button is always visible in the Sendible App, no matter what functionality you’re using, as it sits in the top right-hand corner of the menu bar:

Clicking on the Compose button opens a lightbox where you can create your message and decide how you’re going to publish it. Let’s take a look at the various options:
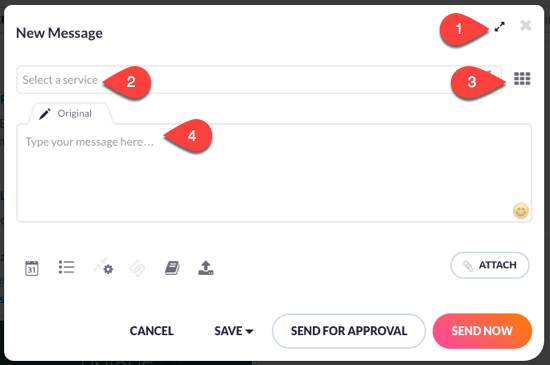
- Maximize the compose box for longer messages
- Select (from the drop-down) which service you want to post to
- Select (from the toggle bar) which service you want to post to
- Write your original message
Now your message looks something like this:
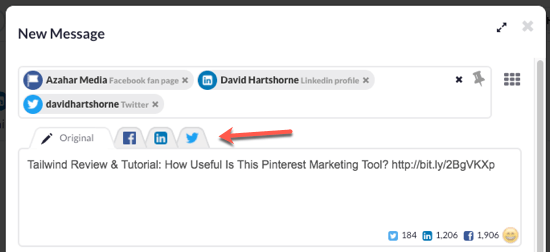
Notice the three additional tabs to the right of the Original tab? These allow you to tailor your message for each social network. For example, you can add hashtags on Twitter, but not Facebook.
As marketers, we know that creating different posts for every social network is considered best practice, but it’s rare we have the time to do it. Sendible’s new feature – Smart Posts – allows you to do this. Take a look at the video:
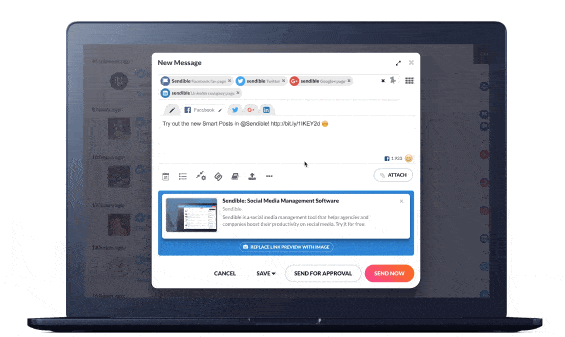
Here’s how it works:
- Open the Compose Box and select multiple social media profiles.
- Click on the appropriate tabs to edit the text and @mentions.
- Adjust your tone, add/remove hashtags, and emojis to optimize.
Smart Posts saves you time and increases your engagement on social media.
Once you’ve composed your message, it’s time to post it or save it.
You can send it immediately, but in most cases, it makes more sense to send it later using the Schedule and Queue options. Alternatively, you can use Content Libraries to store content that can be re-used again when composing messages.
Let’s take a look at these three options.
1 – Schedule and repeat
To schedule your message, click on the calendar icon:
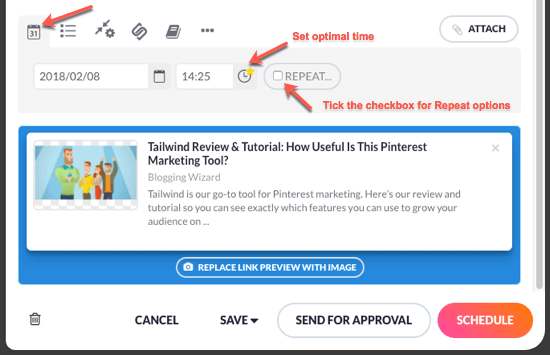
In the gray shaded drop-down area, you can select the date and time you want the message to be posted. If you click on the clock icon, it sets the optimal time for posting. If you only want to share the message once, you can go ahead and click the Schedule button.
But if you want to share the post more than once (highly recommended, especially on Twitter), then you need to tick the Repeat checkbox where you can set up the repeat frequency:
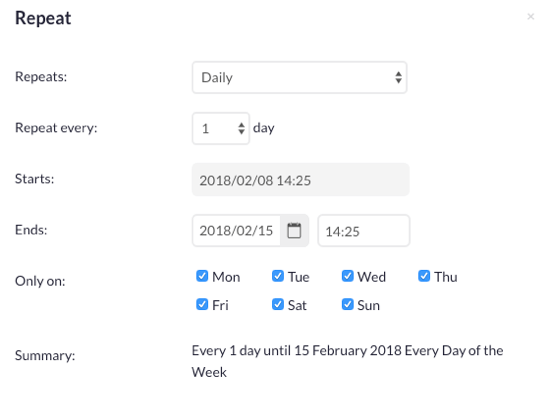
In the example above, the schedule repeats every day for one week. But you can also select from Hourly, Weekly, Monthly, or Annually for your repeat frequency.
Now you can either select the Schedule button or, if you’re working as part of a team, the Send For Approval button.
2 – Queue and recycle
To add your message to a queue, click on the list icon:
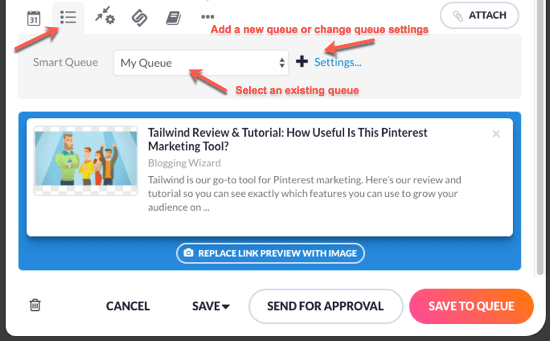
In the gray shaded drop-down area, you can select an existing queue you want to use. You can also add a new queue or change the existing queue settings.
In the queue settings, you can choose whether to recycle the messages or not:
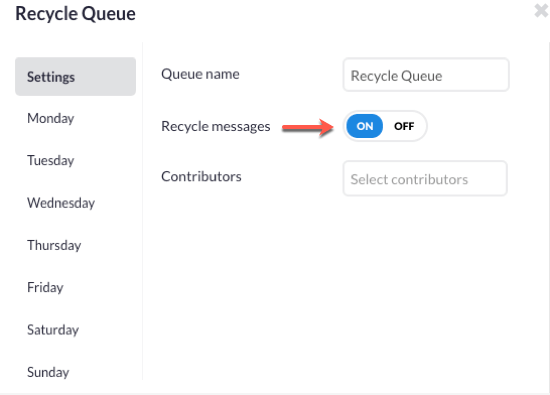
With the Recycle Messages option On, all the messages you add to the queue will be recycled until you delete them from the Queue or turn the setting to Off.
You can add numerous time slots for each day of the week:

- To edit or add a specific time slot, just click on it and select the time or type it in. You can click on the clock icon to select the optimal time.
- To remove a time, select the ‘x’ icon.
- To add a time, select the ‘+’ icon.
For example, I’ve added one time-slot to Wednesday, Thursday, and Friday. Each message that I add to the recycle queue goes in the next available slot.
You can always change the queue order within the constraints of your available time slots afterward. More on managing your messages in a moment…
3 – Content library
Sometimes it’s not always appropriate to schedule or queue your content. In which case, you can use content libraries to store material that can be re-used again when composing messages.
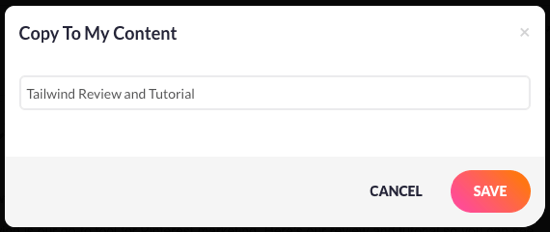
When you compose a message, click the Save button and choose the Copy to Library option:
Then name the content for easy reference:
And now you can see the saved message in your Content Library:
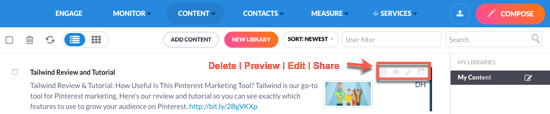
You have the option to Preview and Edit your stored content. When you’re all set, you can share the content using the options mentioned earlier.
But the content remains in your library until you Delete it. This is a time-saver in the long run, as you have a library of stored content that you can quickly search and use over and again.
Managing your scheduled and queued messages
Sendible makes it easy for you to manage the messages you’ve added to your Schedule and Queues.
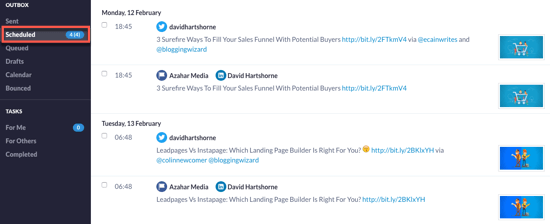
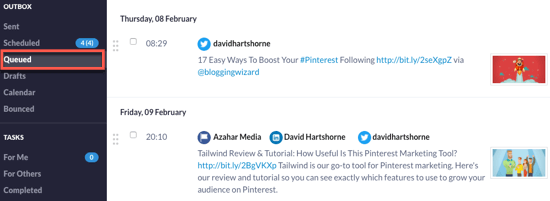
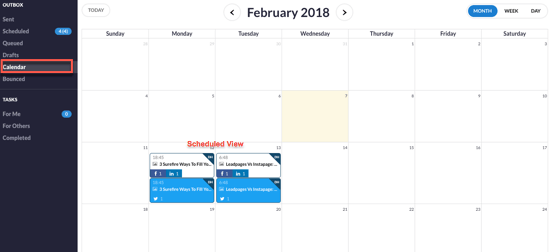
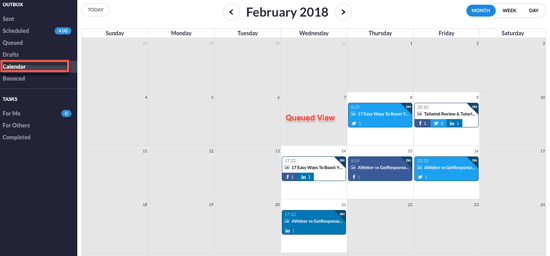
In the Outbox menu on the left-hand side of the dashboard, there are options for Sent, Scheduled, Queued, Drafts, Calendar, and Bounced. Here are some examples:
– Scheduled:
– Queued:
– Calendar (Scheduled View):
– Calendar (Queued View):
You can still edit scheduled and queued messages; for example, you could change the date and time, update the message content, etc. And in the calendar view, you can drag-and-drop messages to different days if you wish to adjust the order.
Summary
Sendible offers a wide-range of options to ensure your evergreen content can be shared many times. Use the innovative compose box, content libraries, and smart queues to plan, schedule, and publish your social messages.
Part 3 – Content curation
A good social media strategy includes sharing content from other sources besides your own. Sendible has two options to help you curate and share relevant content with your audience – Content Suggestions and RSS Feeds.
How to use content suggestions
Sendible analyzes posts already shared on social media and then suggests content that’s most likely to generate high follower engagement. Here’s how to use their suggestions.
Select Suggestions from the Content menu:
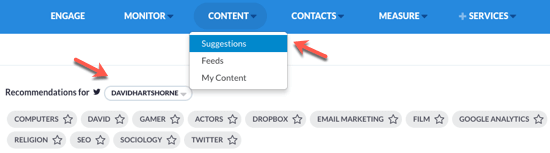
Initial recommendations are based on what you post on your connected Twitter account(s).
If you want to see content on one of those topics, click the relevant button. And if you want to save the topic, click the ‘star’ icon:

You can also scroll down to view recent Staff Picks in categories like Technology & Innovation, Sports, Music, and more.
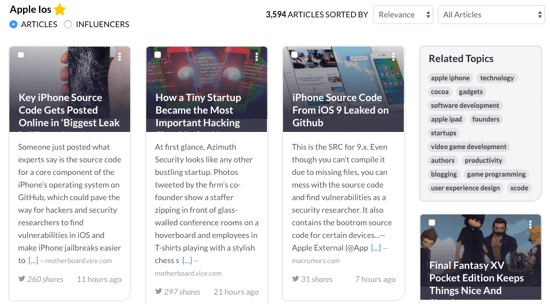
When you’ve found a specific topic that you want to check out, click on the image to see the related content. Here’s the content of the Apple iOS topic:
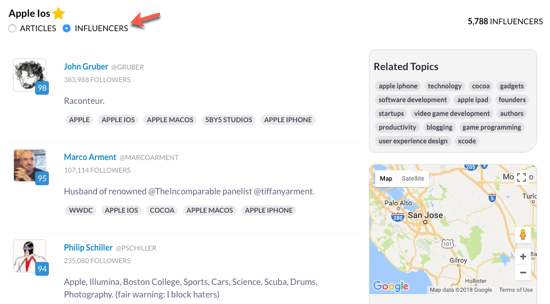
You can switch the view from Articles (above) to Influencers (below):
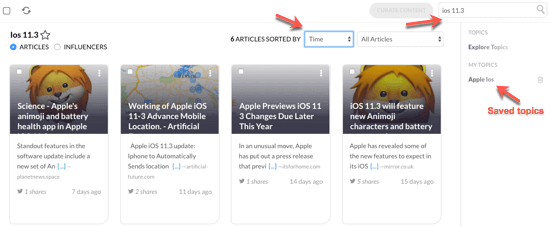
You can also refine the content suggestions with the Search and Sort functions. For example, you could search for iOS 11.3 and sort by Time to display the most recent iOS 11.3 articles:
When you’ve found an article you want to share, you have a few options that mirror the publishing features of the previous section:
- Share Now
- Schedule Later
- Add to Queue
- Save to Content Library
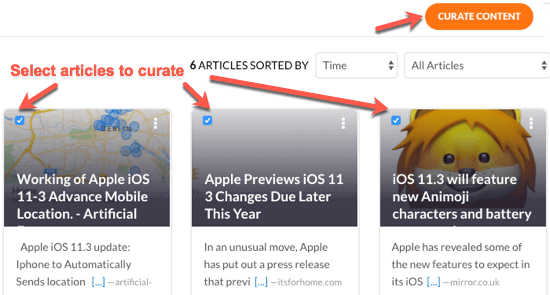
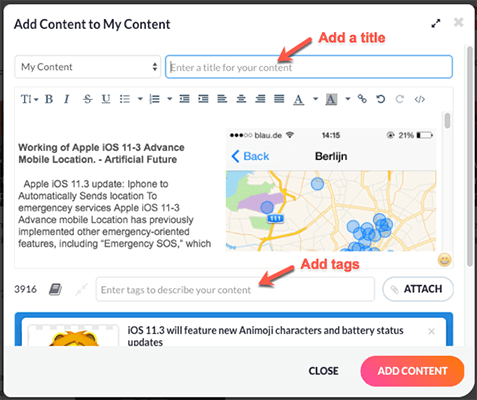
If you want to save a few or all of the articles, you can check the items you want and click the Curate Content button at the top of the display:
The selected articles are saved to your Content Library where you can add a title and tags for reference:
Once saved, you can edit the articles if you wish and then share or schedule them:

How to use RSS feeds
Sendible’s RSS Auto Posting feature lets you publish relevant quality content to social networks at regular intervals throughout the day. Here’s how to use the RSS feeds.
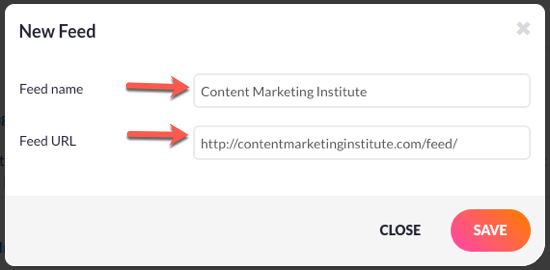
Select Feeds from the Content menu and click the New Feed button:

Enter the details of the RSS feed you want to publish. For example, the RSS feed for the Content Marketing Institute is: https://ift.tt/2AJpqK2
Now you can click on the New Auto Post button:

And complete the RSS Auto Poster settings:
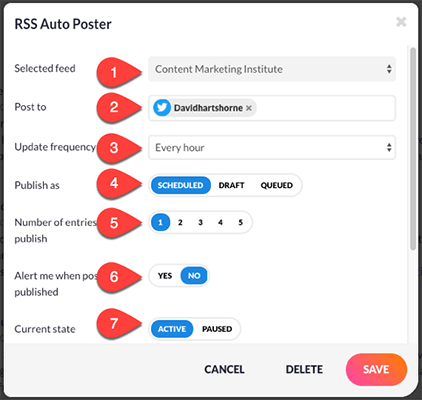
- Check the selected RSS Feed is the one you want to configure.
- Select the social services you wish to post to.
- Select how often the system should check for updates from the RSS Feed.
- Select whether these posts are sent at regular intervals by choosing the Scheduled option or whether they’re saved to your Drafts or Queued for later.
- Select the maximum amount of updates to pull from the Feed.
- Choose whether or not you want an email alert when published.
- Select whether the Feed is Active or Paused.
As you scroll down, there are more advanced settings to fine-tune your auto-posting, but these are the most essential.
Summary
Sendible’s built-in content curation tools help you find and share the best-performing relevant content with your audience.
Part 4 – Reporting
The Measure section is where you can build reports to analyze your social media activity.
You can use Sendible’s Reports Hub to get an immediate analysis of your social profiles and activity. Or you can create your own advanced, custom reports with the Report Builder.
The Reports Hub
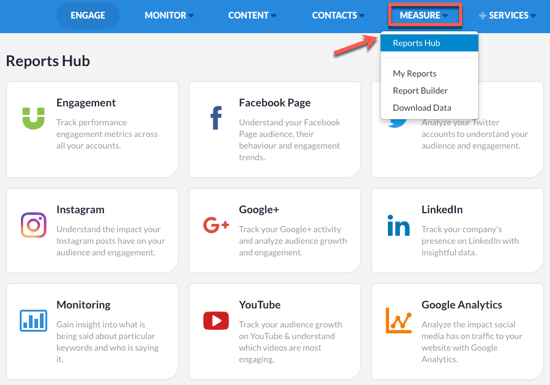
The Reports Hub gives you nine ready-to-go social media reports for an instant snapshot of your social data.
Click on Reports Hub from the Measure menu:
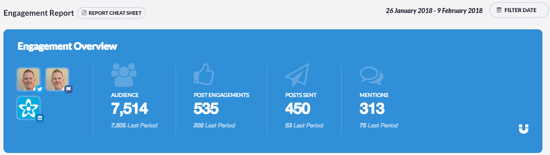
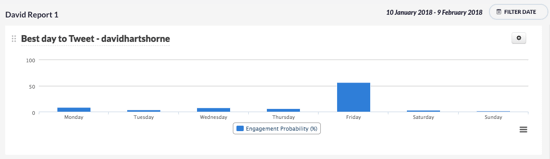
The Engagement report shows engagement performance across all your connected social media accounts. You can gain insight into your combined audience, post engagements, posts, and mentions across all channels to quickly spot trends. For example, this overview combines my Twitter, Facebook Page, and LinkedIn Page:
The other reports are platform specific, but you can combine multiple accounts. For example, you could incorporate three Twitter accounts.
Once you have selected the accounts you want, click Generate Report to view the aggregate Quick Report.
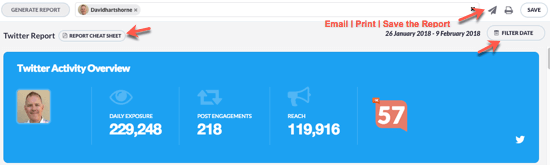
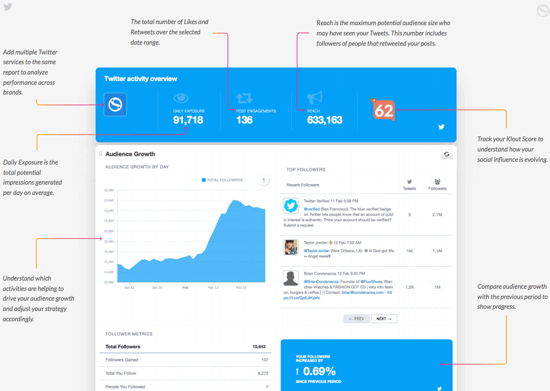
In the top right corner, you have options to email, print or save the report. You can also filter by date, so you can choose a custom date range or use a pre-defined one – Last Week, Last Month, This Week, This Month. Each report has a platform-specific Cheat Sheet to help you understand the metrics:
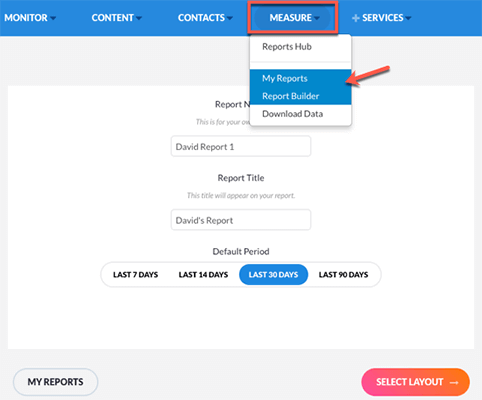
The Report Builder
Sendible also lets you build your own custom reports.
Select Report Builder from the Measure menu where you’ll be prompted to create your first report. Enter your Report Name and Report Title, and then select the Default Period you want:
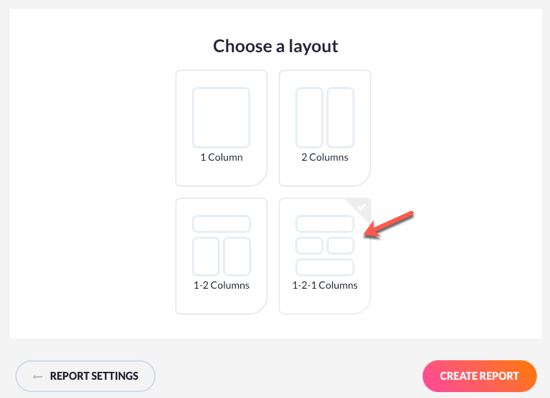
Select your preferred Layout:
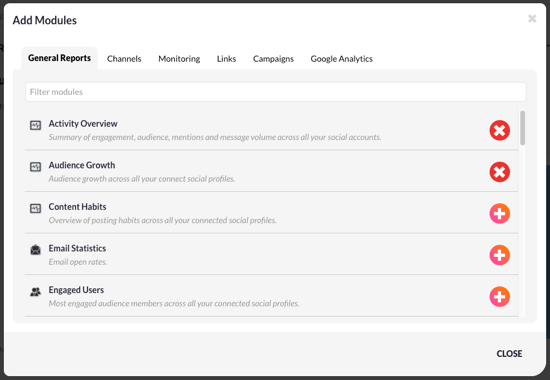
Create your report by selecting which modules you require. There are some general modules and some platform specific. You can add up to 30 modules, from the 250 available, per report:
Once you’ve generated your report, you can drag-and-drop the modules around to shape things how you want:
You also have the option to rename or delete sections. And if you’re servicing clients, you can arrange to send the reports via email on a regular basis.
Summary
Sendible lets you generate in-depth reports for Facebook, Twitter, Instagram, LinkedIn, and more via its Reports Hub. Alternatively, you can build presentation-ready reports tailored for you, your team, or your clients with the drag-and-drop report builder. Either option takes a few minutes to complete.
Pricing
Sendible has a range of subscription plans starting from $24/month:
- Micro – For solopreneurs
- Small – For small businesses
- Medium – For growing agencies
- Large – For large teams
Prices are based on the number of services that you want. For example, the Small plan lets you manage 16 social profiles and build 6 custom reports with 3 users. You also have the option to purchase additional users and profiles rather than upgrading to the next plan.
Sendible also offers a fully-customizable, white-label solution for larger teams and agencies.
If you’re not too sure what you’ll need, you can start with a free 30-day trial to see which plan works best for you.
Conclusion
Sendible is an excellent time-saving tool that lets you manage you and your clients’ social media activities. It helps you engage with your followers, publish social messages, curate content, and monitor your performance.
Disclosure: This post contains affiliate links.
The post Sendible Review And Tutorial: Social Media Management Made Easy appeared first on Blogging Wizard.
Contributer : Blogging Wizard https://ift.tt/2qmrBPd

 Reviewed by mimisabreena
on
Wednesday, April 11, 2018
Rating:
Reviewed by mimisabreena
on
Wednesday, April 11, 2018
Rating:


No comments:
Post a Comment