How to Easily Create and Install a Facebook Cover Video

Video has officially taken over the Internet, and Facebook is leading the way with features such as:
- Live video
- Native video (uploading videos directly to Facebook)
- Video ads
- Facebook Stories
- Facebook Messenger video calls
- Instant Articles
- Instagram Live
- Instagram Stories
It’s easy to upload a “cover video” at the top of your Facebook (business/brand) Page. In this tutorial, I’ll show you how.
Cover Video Benefits
Video allows you to share a story more thoroughly than you can do with a Facebook cover photo.
First-time visitors to your Page are likely to hang around longer because the cover video is the first thing they’ll see. The longer a visitor stays on your Page, the more likely they are to like or follow your Page.
The Specs
- Facebook recommends uploading a video of 820 x 312 pixels.
- Videos can range in length from 20-90 seconds and can loop.
- When people visit your Page, the cover video will automatically begin playing.
- The video will play with the sound muted; there is a mute/unmute option in the lower righthand corner of the cover video.
How to Add or Upload a Cover Video
Adding a cover video is as simple as adding a cover photo. I recommend doing this via a computer – my phone does not (yet) give me the option to upload a cover video, but my laptop does.
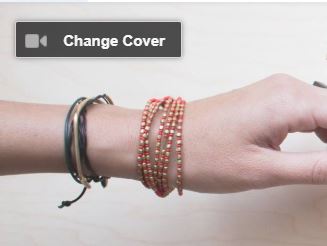
Hover over the upper left corner of your cover photo, and you’ll see a Change Cover icon. Click it.

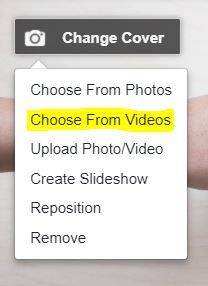
‘Choose From Videos’ option
Several options will pop down. To designate a video you’ve previously uploaded as your cover video, select “Choose From Videos.”

Select a video you’ve uploaded to your Page and click Confirm.
Drag your video around in the cover area until it’s positioned the way you want.
Click Next.
Scroll through your video thumbnails until you find a thumbnail that you want to use as the first frame that displays.
Click Publish.
‘Upload Photo/Video’ option
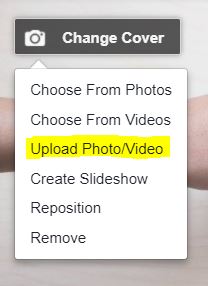
After you select “Change Cover,” click “Upload Photo/Video.”

Select a video that’s stored on your hard drive or flash drive and wait for it to upload to your Facebook Page.
Drag it to reposition it.
Click Next.
Scroll through your video thumbnails until you find a thumbnail that you want to use as the first frame that displays.
Click Publish.
An Easy Way to Create a Cover Video
I decided to create a video slideshow to promote my online course, Your Website Budget Blueprint.
I logged in to my Storyblocks account. A lot of their images are what I call “cliché stock.” In other words, they feature cheesy, stock-looking images of happy businesspeople shaking hands. I decided to create a cover video that intentionally featured cheesy stock images.
The whole process took 2 ½ hours, which included a bathroom break, snack break, and shooing away a door-to-door salesman who tried to sell me ant- and spider-killer services.
How I Spent My 2.5 Hours of Video Production
- Sketched out a story board on a piece of scratch paper (yeah, I’m high-tech!). My story board included a rough idea of the text/captions (the story I wanted my video to tell).
- Searched for quirky stock pictures that illustrated my story.
- Downloaded the stock photos and resized them.
- Logged in to Adobe Spark Video (It only takes a minute to create a free account).
- Picked a template (you can start from scratch with a blank slate if you prefer, or you can customize a template however you want).
- Uploaded my stock photos, slide-by-slide.
- Dragged-and-dropped slides to re-order them.
- Deleted the slides I decided not to use.
- Typed captions on each slide. I decided to let my captions tell the story instead of adding voice-over narration, as 80% of people watch videos with the sound muted. But narration is an option, too!
- Set the timing for each slide (my slides display from 1-4 seconds each).
- Listened to every single background music clip in the Adobe Spark Video library, and settled on a clip called, “Careful Scene.”
- Tested every single theme and selected the “Slideshow” theme, which shows off my pictures and captions best.
- Previewed my video at least 10 times.
- Downloaded the video to my hard drive.
This is the result.
Next Steps
Next, it was time to upload my masterpiece to as many social media channels as possible.
Facebook – I published it as an organic post and marked it as the “featured video” on my Page.
Then I created a video ad campaign.
And I uploaded it as my cover video, of course!
Twitter – Uploaded the video and tweeted it.
Google+ – Uploaded the video as a post.
Vimeo – Uploaded it to my channel.
YouTube – Uploaded it to my channel.
Pinterest – Linked to the YouTube video.
Instagram – Sent it to my phone and uploaded it.
LinkedIn – Linked to the video stored at Adobe Spark.
Blog – Finally, I embedded the video in this blog post. Adobe Spark gives you embed code that looks like this:
<iframe src=”https://spark.adobe.com/video/4kQbbBKztCI7D/embed” width=”960″ height=”540″ frameborder=”0″ allowfullscreen></iframe>
Click the Text tab in WordPress or the HTML tab in other content management systems and paste in the code. (My embedded video displays near the top of this post.)
Did it Work?
I wanted my video to be fun, whimsical and to encourage people to visit the link to the landing page for my online course, WebsiteBudgetBlueprint.com.
What’d you think?
Are you ready to create a cover video for your Facebook Page? I know you can do it!
Give it a shot, and share the link to your Facebook Page once you’ve added your cover video – I’d love to watch it.
Freebie
Need ideas for how to use video? Check out 20 Ways to Use Videos in Your Social Media Marketing (Without Being a Professional Videographer).
And be sure to sign up for your free Video Brainstorming Bonanza Workbook.
I want the Video Brainstorming Bonanza workbook!
Tweet It
How to use Adobe Spark to create a Facebook Page cover video
79% of all Internet traffic comes from video. Wow!
Facebook cover video: How to easily create and install one
95% of the people who like your Facebook Page won’t return to your Page. How to fix that.
More than 80% of Facebook video ads are watched with the sound OFF
Contributer : Blogging Bistro

 Reviewed by mimisabreena
on
Saturday, April 21, 2018
Rating:


No comments:
Post a Comment